Pages

Showing posts with label DIY. Show all posts

Tuesday, November 14, 2017

Light the World 2017

This year my church has put out the new initiative to light the world. It is a challenge to become more christ-like during this holiday season. In an effort to help my children, I have created this word strip PDF that I can print out and cut and make a chain. Each day we can rip off a strip, read the verse, and discuss is a family how we can complete the challenge. I'm sharing the PDF with you today so that you might be able to do this with your family as well.

Click here to view and print the PDF.

I hope you all have a fabulous holiday season.

Love, Morgan

Tuesday, February 14, 2017

Valentine Coupon Book

Hi Friends!

I made this a few weeks back, but was afraid to post it too soon since I was planning on giving it as a gift to da hubs for Valentine's Day and didn't want to spoil the surprise for him. Cause he reads this blog. Sometimes. When I tell him to. 😉

And so I am giving it to those of you who are scrambling for a last minute gift idea to put together before your sweetie comes home from work. Or for those who are so on it, they are already prepping for next year. If that's you, good on you.

Can we first say that I LOVE VALENTINE'S DAY!?? Cue all the heart emojis Blogger has to offer...aaaaand GO: ❤❣♥♡💓💖💗💘💙💚💛💜💝💟😍💕💞

I really do.

It makes me feel happy inside.

Even in college when I didn't have a S.O. I loved Valentine's Day.

WHO WOULDN'T WANT TO CELEBRATE LOVE??

And to those of you who hate it because "you should be telling the people you love that you love them every day, you don't need a special day, blah blah blah, my name is Eeyore..." I hope you also hate Christmas and Easter, cause same principle applies!

Ah HA! I gotcha there, now didn't I??

ANYWHOOOO... Onto the booklet.

You can download it one of two ways which are as follows:
     ❥  Download only the pages you want. Hand them out as individual Valentines/Coupons, keep
          them all for yourself, etc
     ❥  Download the PDF and print them in duplex mode, making sure not to let Reader resize them,
          cut them out, and bind them however you like to (I just sloooooowly sewed mine together with
          my machine).

Now that that is out of the way, I must warn you; if you don't like terrible love puns about blubbery sea-creatures, then this ain't the book for you...


Wait for it...


And BEHOLD!
Front Cover | Download here


Butterfly Over Here | Download here

It's Irr-Elephant | Download here

Ugly Duckling | Download here

My Beary Favorite | Download here

Tweet Little Bird | Download here

Long Giraffe Love | Download here

Anatomy | Download here

Rat Here, Rat Now | Download here

Ensnared, Ensailed | Download here

Ring-Ding-Ding-Ding-Ding-Ding-Ding | Download here

-OR-

 DOWNLOAD THE WHOLE BOOKLET HERE.

Tuesday, October 25, 2016

You don't meet a girl like that every Dynasty.

Halloween is upon us, y'all! Last year I waited a long time to post my Halloween costumes because by the time I had pictures of the boys in them it was after Halloween and I figured people wouldn't be looking up costume ideas in the middle of December...maybe I was wrong?

Anyway, this year I figure why the heck not post? If this post gets buried under a year of other posts across the world wide web it'll just join every one of my other posts.

I just said posts four times in one sentence. Let's ignore that cause I'm not rewriting it...

This year I had grand plans for Halloween. Ever since I was a senior in high school I've always wanted to dress up like Lucius and Narcissa Malfoy and have my kids be house-elves. So this year I figured I could go for it.

It turns out that 3 1/2 year olds have opinions on what they get to be for Halloween. Bummer.
My oldest told me he wanted to be a fish for Halloween. A fish. Laaaame. Trying to be creative I decided he could be Flounder, my youngest could be Sebastian, my husband could be Prince Eric, and I could be Ariel. That'd be fun! I started brainstorming the boys' costumes (luckily not buying materials yet) when my oldest started getting really into Mulan. Like, really really into it.

We'd borrowed the soundtrack from the library on a whim, "Hmm, this might be fun, throw it in the bag..." and that kid glommed onto it so hard. He was watching the movie at least 4 times a week. Every car trip was 4 songs on repeat, and most conversations we had were in some way related to Mulan. I'll tell you what, I wasn't complaining. I love Mulan! I love the music, I love the humor, and now, as I parent, I cry several times throughout it, each time I watch it; I can't help it.

So when I asked my bud if he was sure he wanted to be a fish for the eleventy-millionth time and he said, "No, I changed my mind. I want to be the funny guy. I want to be Mushu the dragon!" I wasn't surprised.

I was hesitant at first. How in the world was I going to make a dragon and cricket costume??? But after some digging, and some ideas of my own I got to work, trying to make it as simple as possible.

A Very Mulan Halloween

Starring D as Kri Kee, L as Mushu, Shawn as Li Shang, and Morgan as Mulan

Kri Kee

For D's costume I stumbled upon this photo on the Googles:
It's adorable and seemed really simple to DIY. I dug around in things I had on hand and was able to make this costume quickly.

What I had on Hand:
  • An old blue onsie 
    • I unpicked the sleeves and hot-glued black ribbon in lines across the little belly.
  • A set of warm navy blue underclothes
    • I did have to buy sweats - I had the thermal top.
  • Purple felt 
    • I hot-glued the wings to the shirt and will probably go back and stitch it on.
  • Black & white felt
    • I hot-glued them to the beanie.
I purchased:
  • A purple beanie from Value Village
  • Black pipe cleaners
    • I just fed the pipe cleaner straight through the beanie, fed it back up ~ 1/2 inch over, and wrapped the end of it around the top to avoid sharp ends sticking into heads.


Krik Kee - 

Mushu

For L's costume I found two points of reference. I took bits and pieces from the following:
  • This picture:
  • This YouTube video (just concepts, not technique...)


After doing the full-body suits last year (and knowing that Shawn's costume would be a lot of work) I knew I wanted to start with a red long-sleeved top and some sweats as a base so I wouldn't need to create everything from scratch. This was a good choice. Unfortunately I had very little on hand for this costume. 

What I had on hand:
  • Batting for the tail
  • Diaper pin to pin the tail on.
What I Purchased:
  • Red top and bottoms from Walmart
    • They were each only $3.88, the color is very vibrant, and the sweats feel so soft and warm. Score! I could only find the top in a 5T which I decided would be perfect; since it's not warm enough to wear alone, he can wear a warmer layer underneath.
  • Black ribbon
  • 1/4 yard of Yellow cotton fabric for the tummy
    • I sewed the black ribbon in stripes across a strip of this (getting farther apart at the widest places and closer together at the thinner areas). I hand-sewed the striped strip down the middle of the shirt and made another strip (that narrows at the crotch) and machine sewed it to the pants.
  • 1/2 yard of red cotton fabric for tail
    • Cut out a long strip of red that was larger on one end, sewed up the sides, turned inside out, used a piece of at the bottom of the tail to make it curve up, and stuffed that thing so full it is bulging.
    • Sewed along the top - pinned to back of pants.
    • I used a piece of the red felt (below) and cut it in a 'fire' ish type shape and sewed it onto the end of the tail.
  • Red and yellow thread.
  • Red beanie
  • Red, Black, Blue (2 shades) felt for ears, horns, and back plates
    • Similar to the video I used foil to shape the horns and covered them with felt with hot-glue.
    • Unlike the video, I cut the back of the shirt open and sewed the back plates into the shirt so that they would stand up better. It was way easier and looked a lot nicer.
    • Unlike the video, I hot-glued the horns and sewed the ears to the beanie since I didn't have a hood, and I assumed it would have more support than a hood.
    • Unlike the video, I glued a piece of black felt on top of the ears instead of coloring them with Sharpie - it looked a lot better.
  • Yellow pipe cleaners for whiskers
    • I just threaded them through the bottom of the knit beanie similar to the way I did Krik Kee's antennae.


Mushu - 

Li Shang

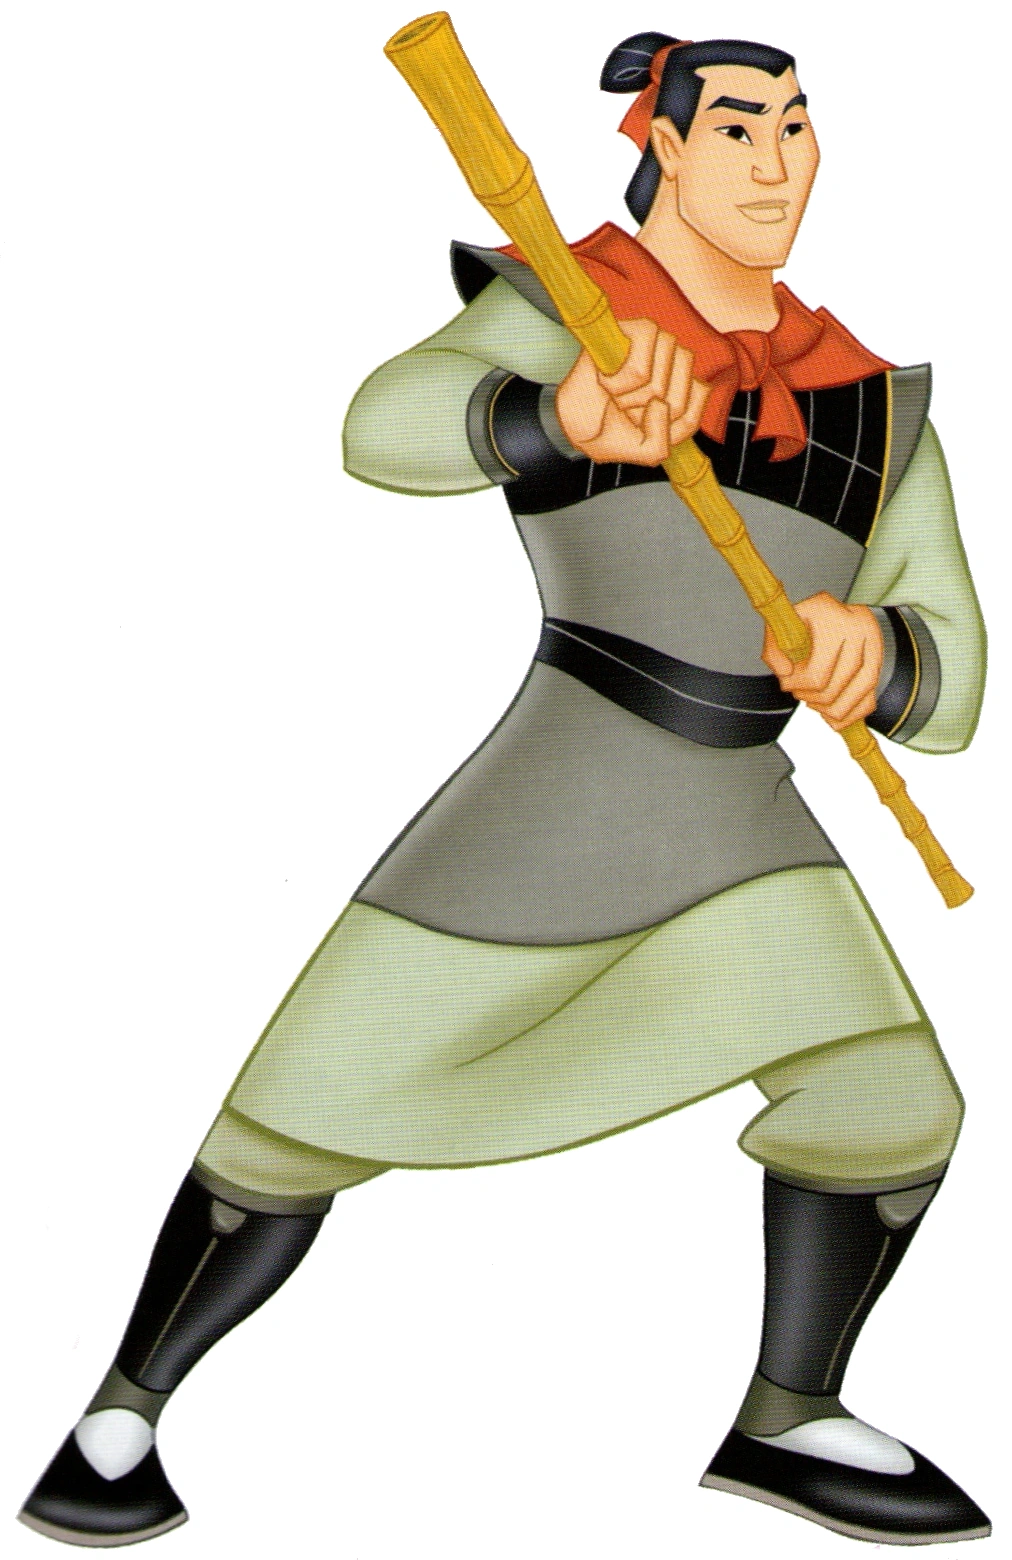
For Shawn's costume I found a super awesome YouTube video, a picture, and a blog post that I used as a point of reference.
  • The picture :


  • The YouTube video:

What I Had on Hand:
  • Off-white button up long-sleeved shirt
  • Long tan skirt (mine)
  • Khaki pants
  • Black church shoes
What I purchased:
  • Black material - I found 1 yard of 'speaker' material in the remnants bin for cheap.
    • I used this for:
      • Shoulder cover thingy-ma-bob
        • Watch the video, I did it almost exactly like she did
      • Wrist guards
        • Made similarly to, but much more poorly than, the video
      • Shin guards
        • Just wrapped fabric around the legs like in the video.
      • Belt/Sash
        • Cut a long strip that would go around Shawn's waist 1.5 times, folded it in half, sewed up the sides (I was okay if it wasn't totally lined up because I wanted it to look a little 'bunchy'...is that the right word?), turned it right side out. I wrapped starting in the back and then safety pinned the two ends to the shirt and other part of sash.
  • Gold ribbon for wrist guards and shoulder cover thingy-ma-bob.
  • Grey wide tank dress from Value Village
  • 1 yard red cotton fabric for the cape
    • I did not sew anything, I just tied it around his shoulders.
  • Black Beanie
  • Black Yarn
    • The wig tutorial I'm sure is awesome, but I was not good at it and our wigs are completely ridiculous. But they made us laugh, so we'll keep it.
    • I followed the Cinderella bun tutorial for Li Shang's wig.
    • I used some of the Mulan ribbon I purchased (below) to tie around the bun.


Li Shang - 

Mulan

For my costume, Thrifted Transformations came through again with a companion YouTube video for Mulan. I took ideas on what types of items I could use or thrift and then used the picture below (because it was the most basic outfit Mulan wears in the movie) as a point of reference. I also used the same Blog Post on wigs to attempt mine. It was a terrible flop, but I tried...
  • The picture:
What I Had on Hand:
  • Green (tealish) deep V long-sleeved blouse
  • Tan tank top
  • Shawn's old navy blue t-shirt
    • I measured my above my bust, waist, and hips; armpit to waist;  and waist to hips.
    • I folded the shirt in half.
    • Starting just under the collar I measured a 1/4 of bust measurement from fold toward sleeves (not getting all the way to the sleeve) and marked the line (this will be the top of the garment).
    • I measured from there down my 'armpit to waist' measurement and marked a line from fold towards sleeve (this will be the center of the garment) the length of 1/4 my waist measurement.
    • I measured from the that mark down my 'waist to hips' measurement and marked the 1/4 hips measurement line (this will be the width of the bottom of the garment).
    • I cut that out, sewed up the sides, hemmed the top and bottom and called it a day.
What I Purchased:
  • Yellow maxi dress from Value Village
    • I wore the dress around my waist to get me the length I needed.
  • Wide maroon ribbon
    • Wrapped a length of the ribbon around my waist several times and safety-pinned it in place.
  • Black Beanie
    • For wig (baaaaaaaaaaaahahahahahahaha...)
  • Black Yarn


Mulan - 

And that's a wrap! My boys LOVED their costumes this year! L has told me about 10 times that he wants to wear his Mushu costume LOTS of times, and D wears his hat all day everyday. If you want to check out what we did for Halloween last year you can see them here.


Happy Halloween!

Tuesday, October 18, 2016

1-2-3 Eat Lunch With Me


I wrote the title to this post over 13 months ago.
Which means that I did this activity with my oldest son over 13 months ago for the first time.
When I did it that first time I forgot to take pictures, which means I couldn't write this post.
And I didn't do it again with my son again until just a month or so ago - at which time I remembered to take pictures.

So if you see this activity and are thinking, "Wow, this mom does these cool things with her kids all the time. She's so fun with her kids and I'm the worst mom ever," just stop right now because I've done this twice with my kid in over a year. Hardly counts as 'all-of-the-time'.

If you didn't think that at all and you're now thinking that I'm nuts just carry on. I never think those things when I read mommy-blogs. Never. N-E-V-E-R.

Okay, anyway, to the actual post.

At the time I first did this my oldest - then almost 2 1/2 was just getting the hang of numbers. He could count to 20, but he didn't understand numbers in their context as well as he does now - over 3 1/2 years old. I thought it would be a fun way for him to understand what the numbers he knew meant, and encourage him to eat better. He still eats like...a toddler (hot dogs, cereal, plain fruit/veggies, candy) but maybe he ate better the two days I did this. Who knows?


What you'll Need

  • The food you are going to feed your kid for lunch
    • I like to aim for all the food groups. Cheez-Its are clearly a grain AND a dairy item...Yeah, no excuses. I feed my children crap.
  • Toothpicks
  • Pen
  • Stickers
    • I realize you can buy little flag stickers at all sorts of places, but I don't have them and wouldn't normally buy them. I had some rectangle stickers in 4 colors that I folded in half around the toothpick, cut, and wrote numbers on.
  • Scissors (see Sticker commentary above).
  • Something to put your kids' food on. Unless you put it directly on the table or a tray (hey no judging here! I get pelted with dishware almost every other meal...).

Then you get creative. How can you get 1 cheese stick to be a 3? Cut it up!

Poke your food and serve it up to the kiddos!


You can help them count all of their different options or let them eat the toothpicks until you realize they are actually going to eat the toothpicks and OH MY GOSH STOP EATING THAT YOU WILL HAVE SPLINTERS IN YOUR THROAT. No, that did not happen with my 21 month old. That last sentence was a lie.


This kid came in from grocery shopping with big alligator tears rolling down his face, but this lunch had him cheered up in a Jif (you see what I did there?).


Monday, August 1, 2016

Kangaroo & Koala Costumes - DIM'd

If you're looking for a tutorial this is NOT the place, but if you're looking for a bunch of text that probably goes in circles, then I've got you covered!

My oldest got to be a Kangaroo and my youngest was a Koala for Halloween last year! I haven't done very much sewing in the past, so I was nervited (nervous/excited. it's my word.) to try and make the costumes.

Originally I wanted it to be as simple as possible. A solid sweatsuit with some ears and a tail, done. As most projects go, it became much more complex, quickly. It appears that most stores that I looked at don't sell plain tan/grey sweatsuits in  12 months and 2T. Weird.

I hunted Gap, Target, Walmart, Shopko, and Kohl's. Nothing from what I could tell. I then browsed our local Value Village for anything, and again, nothing. When I was done hunting in their clothing section I decided to look at their 'home goods' area in hopes of some scrap material, and I didn't see any material, but I did find the perfect colored fleece blankets.

I purchased one in tan (it was crochet on the edges but I just took out the wool before washing it) and one in grey. I headed to Walmart for some matching thread and a zipper, and I picked up some stuffing from JoAnn Fabrics (wishing I'd used a coupon, but you win some you lose some).

For the kangaroo, I was planning on making a pouch, but after deciding to do a zipper in front, I justified going without one because male Kangaroos do not have pouches (and I didn't have enough material leftover). I was also concerned about making it too complicated to get out of, because my son is newly potty-trained and he waits too long some times.

For the main body I followed this video.
For the hood I found this video helpful.

Instead of cutting 4 pieces for the body I just cut 2 and cut the front piece in half to insert the zipper. It's cause I'm lazy, and I don't...not recommend it, but I also will tell you that it does make that ankle smaller, so maybe cut the leg your putting the zipper into slightly bigger to account for that (assuming you're going to be lazy like me...).

Kangaroo
The tail I totally free handed, sewed up both sides,and stuffed with fluff (like Pooh Bear - YWIA for getting that stuck in your head). Once it was very firm (I didn't want it floppy) it was hand sewn onto the buh-tooshky. It sagged a little because I made the bottom half of the body wider (ended up looking like drop-crotch pants with the narrow ankles - a fashionable kangaroo!)

I bounced (you see what I did there?) back and forth on making the costume footed or non-footed, and finally decided that if he was going to walk around in it outside (which is what you do on Halloween) that I'd make shoe covers instead. This allowed me to make his feet 'look' like long kangaroo feet, which was an added bonus. I also free-handed the foot pattern according to the former video but excluded the bottom of the cover and stuffed the long toes with more fluff. After my son walked in them I noticed the shoe covers shifted around a bunch, so I added an elastic strap under the covers to hold them onto the shoes.

The ears. I free handed the shape of them and cut 4 pieces. My aunt had some iron on felt that I used to make the ears stiff and she ironed it on each side for me before sewing. Then I sewed up all but about an inch - right sides together - and turned them inside out and whip stitched (is that the right term??) the hole. I poured over Kangaroo ear pictures and decided to tack each side in - the one side only a little bit, and the other side more - then hand sewed them to the hood.

Koala
I free handed the ears and made them similarly to the second video, but I sewed the front and back pieces to a 1 inch wide piece of fluffy trim so that the top of the ears would be...fluffy. :) I stuffed them, sewed them together, and then hand-stitched them to the hood.

I cut out two little circles and an oval (it's actually a little wider at the top than the bottom) for the eyes and nose and hand-stitched them onto the hood.

For the feet I used the second video's idea but cut a 'claw' piece out of black felt and sewed it between the top and the bottom of the foot. I cut the bottom of the foot out of white felt.

For the tummy I cut a large (but not large enough it turns out) oval shape out of white felt and sewed it on. I made the mistake of adding the belly before adding the zipper, so in true lazy Morgan fashion, I just installed the zipper to go around the tummy.

I also sewed on the hood too soon, so I ended up having to put my son's head in first, then his legs, then his arms, and finally zip it up. Chalk it up to experience, I say. :S


My husband and I went as 'Australia' characters. I tried to pull off the Nicole Kidman look, but it was raining and my hair fell. We found my husband's Genuine Australian hat at the Value village as well.

If you're wanting to attempt Kangaroo or Koala costumes this year (or really any animal) I highly suggest it! You can totally do it if I can!